How to create Size Charts Using Static Blocks in magento

Here are steps you have to follow:

STEP 1: Create a new static block called “Jackets Size Chart” identified by “jackets-size-chart”

STEP 2: Create a new attribut called size_chart_template

Go to Admin->Attributes->Manage Attributes
Add new attribute with the following properties:

Attribute Code : size_chart
Scope: Global
Catalog Input type for Store Owner : Dropdown
Unique Value : No
Required value : No
Input Validation for store owner: No
Apply to * : All Product Types
Use to create Configurable Product : No

For Frontend Properties: No everywhere and Position to 0
In Manage Label/Options:
Admin : Size Chart Template
add your options for example:
jackets-size-chart (remember this is the identifier of your static block)
Save your attribute.

Now go to Catalog->Attributes->Manage Attribute Sets
Select your set and add the attribute you have just created. (drag and drop)
Now we are going to assign to the product

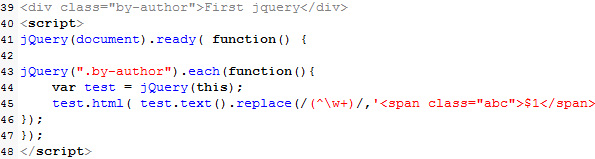
Open app/design/frontend/default/yourtemplate/template/catalog/product/view.phtml and paste the following code. (where you like to see your size chart info)

size-chart

Note: size_chart is the name of attribute and the option of the attribute will be same as the identifier of static block.

How to add “Starting at $50.00” in place of “$50.00- $100.00 in price / how to add text before variable product price in woocommerce

add_filter(‘woocommerce_variable_price_html’, ‘custom_variation_price’, 10, 2);
function custom_variation_price( $price, $product ) {
$price = ”;
if ( !$product->min_variation_price || $product->min_variation_price !==
$product->max_variation_price ) $price .= ‘<span class=”from”>’ . _x(‘From’,
‘min_price’, ‘woocommerce’) . ‘ </span>’;
$price .= woocommerce_price($product->min_variation_price);

return $price;
}

How to use CSS “attr” and “content” for Tooltips

Use the following Html and css :

<button data-hover=”this is the data-hover content”>Hover Me</button>

button{
position: relative;
background: #000;
padding: 10px 30px;
font-size: 15px;
border: 3px solid #000;
color: #fff;
}
button:hover{
background: green;
}
button:before{
content: attr(data-hover);
position: absolute;
background: #000;
color: #fff;
font-size: 13px;
bottom:-3px;
left: 100%;
display: block;
padding:7px 10px;
width: 100%;
opacity: 0;
transform: translateX(0);
transition: transform 0.3s ease, opacity 0.2s ease;
}
button:hover:before{
transform: translatex(20px);
opacity: 1;
}
button:after{
content: “”;
position: absolute;
border: 10px solid transparent;
border-right-color:#000 ;
right: 0;
margin-top: -10px;
top: 50%;
z-index: 1;
opacity: 0;
transform: translatex(25px);
transition:transform 0.2s ease-out, opacity 0.1s ease-out;
}
button:hover:after{
transform: translatex(20px);
opacity: 1;
}

Add class in first word through jquery

Add the following html and js:

First jquery

jQuery(document).ready( function() {

jQuery(“.by-author”).each(function(){
var test = jQuery(this);
test.html( test.text().replace(/(^\w+)/,’$1‘) );
});
});
add-class
Note: Please remove space if any before first word.

If you want to load js after some time please add:

jQuery(document).ready( function() {
setTimeout( function(){
// Do something after 1 second
paste your code………….

});
} , 5000 );
});

slideup or slidedown on mouseover and mouseleave (dropdown js)

Add the following js code:

if (screen.width >= 770) {
jQuery(document).ready(function(){
jQuery(“#navMain”).slideUp();
//jQuery(‘.shopNav,#header-nav’).append(”)
jQuery(“#header-nav”).mouseover(function(){
//jQuery(“#nav”).animate({height: ‘show’}, ‘slow’);
jQuery(“#navMain”).slideDown();
//jQuery(“#header-nav”).addClass(“activebox”);

});

jQuery(“#header-nav”).mouseleave(function(){
jQuery(“#navMain”).slideUp();
});

});
}

And HTML

Shop By

</div>

Note: If you want to show this effect on mobile screen also, please remove “screen.width” js. (if (screen.width >= 770))

Magento connect manager show “500 Internal Server Error” error.

To overcome 500 Internal Server Error :

1. change the folder permission of below folder to 777
-app/etc
-var
-media
2.change the file permission of below files from 664 to 644
-index.php (main index file in magento root folder)
-downloader/index.php ( otherwise if you will try to access System > Magento Connect >Magento Connect Manager (after magento installation) by logging to magento admin, you will get 500 Internal Server Error.)

How to add custom design in checkbox through css3

Add the following code in your stylesheet.

input[type=”checkbox”] {
display:none;
}
input[type=”checkbox”] + label span {
display:inline-block;
width:64px;
height:64px;
margin:-1px 4px 0 0;
vertical-align:middle;
background:url(check_radio_sheet.png) left -70px no-repeat;
cursor:pointer;
}
input[type=”checkbox”]:checked + label span {
background:url(check_radio_sheet.png) left top no-repeat;
}

HTML
<input type=”checkbox” id=”c1″ name=”cc” />
<label for=”c1″><span></span>Check Box 1</label>

Note: Please insure that the value of “ID” and “for” will be same . (id=”c1″ and for=”c1″)